


Quick Start Guide
NOTE: This guide does not supersede Manufacturer Manuals or FAA Accepted information. Always ensure you are familiarized with all available data and guidance before performing maintenance tasks.


Remove the top layer of foam to access included documents (manual, calibration certificate, return postage label, etc)

With a 3/8" wrench, attach the vibration sensor to the mounting bracket. If the threaded rod of the senor is loose, it can be tightened with an allen key.
**The sensor is extremely fragile**
**Do not drop sensor or twist wiring**
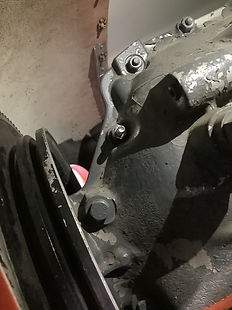
Install the included mounting adapter stud to the most forward case bolt practical.
A deep socket is recommended.


Install the vibration sensor/bracket to the engine stud. Ensure that the engine cowling does not come into contact with the sensor cable.

Route the cable out of the engine bay, taping off every 12"-18". The other end will plug into the balancer - route in a way that makes sense for your operation.

Changing gears now - mount the photo sensor to its mounting bracket using the black threaded nut.

Plug the photo sensor into the Balancer. Carefully align the connector pins.

Set the photo sensor on the top cowl.
Turn on the Balancer.
Ensure that the engine ignition system is 'OFF' and take caution positioning the propeller.

Next, we will place the reflective tape on the propeller. Powering on the balancer illuminates the light, making it easy to place the reflective tape.

Place the reflective tape on the propeller, lengthwise with the span of the blade.

Affix the sensor to the cowl using removable tape 12"-18" from the blade. Secure the yellow cable with tape.
Turn off the balancer to conserve battery.
General Tips and Advice


Placing Weight Accurately
The balancer will direct you to place weight at various degrees. A protractor is included for accurate placement.
1) When the protractor and vibration sensor are aligned, the prop is at "0 degrees" when the photo sensor & reflective tape are also aligned.
2) You can use a tape edge to determine at what degree your spinner screws are when placing weight.
3) Never lie to the Balancer. If you are unable to place weight where it directs, enter in where you actually place weight. After the first engine run, it will automatically split weights between available positions and calculate for you.
Balancer Battery Life
We supply high capacity rechargeable batteries in the kit. Because our supplied batteries are higher capacity than standard AAs, the Balancer's battery indicator may prematurely show that the battery life remaining is lower than it actually is.
There is generally no need to replace the batteries until the battery indicator begins blinking. If you are in the middle of a balance job, removing the batteries will power off the balancer, but will not delete the memory, provided new batteries are installed within two minutes.


'Power' vs 'Reboot' Buttons
This is the power button. Pressing it simply turns off the Balancer and the screen to concerve battery, but stores the current balancing job.
This is the reboot button. If you press this, the current balance job will be cleared completely.
Other Best Practices:
Monitor your engine temperatures and perform engine runs into the wind. Your engine cooling capacity is reduced without the pressure generated from forward airflow in flight.
Conduct engine runs on clean ground to avoid gravel/debris from nicking the propeller. Be mindful of your prop blast behind the airplane.
Tailwheel Pilots - when performing your engine run, keep the elevator back and ensure the tail is tied down to avoid a potential prop strike. Consider not using wheel chocks so that the airplane can roll instead of pivoting about the main gear.

